miércoles, 25 de diciembre de 2013

Tarta de Santiago

(For English version please read below)

Una tarta típica de la región española de Galicia que se ha ido extendiendo por toda la península. No lleva ninguna harina por lo que se vuelve un postre o merienda ideal para celíacos. Siempre que vigilemos que los ingredientes que usamos sean libres de gluten por contaminación cruzada. Os dejo los ingredientes y pasos a seguir para conseguir sorprender a los invitados y disfrutar de una dulce tentación.


 INGREDIENTES:

- 4 huevos
- 250 gr de almendra molida
- 200 gr azúcar semi-integral (o blanca)
- Ralladura de 1/2 limón
- 1 cucharadita de café rasa de canela en polvo
- Azúcar glas para espolvorear
-Molde redondo de unos 26-28 cm
- Molde de la cruz de Santiago en papel.

PREPARACIÓN:

- Batir los huevos en un bol. Ir agregando el azúcar poco a poco sin dejar de remover. Añadir el limón y la canela.

- Tostar las almendras molidas en una sartén sin aceite unos 5-7 minutos. Remover de vez en cuando. Veremos que cogen un poco de color. Apagar y dejar enfriar antes de añadir a la mezcla anterior.

- Una vez todo mezclado añadir al molde previamente engrasado con unas gotas de aceite.

- Hornear a 170 ºC durante 30 minutos. Dejar enfriar.

- Colocar la cruz de Santiago en el centro de la tarta y tamizar el azúcar glas por toda la tarta. Retirar con cuidado el molde de la cruz y listo.


--
A typical cake from the Spanish region of Galicia that has spread throughout the country. The original receipe is without flour so it becomes a perfect dessert or snack for coeliacs. Just need to control that the ingredients that we use are free from the gluten by cross contamination. Here the ingredients and instructions for surprise guests and enjoy a sweet temptation.


INGREDIENTS:

- 4 eggs
- 250 gr of ground almonds
- 200 gr withe sugar 
- Zest of 1/2 lemon
- 1 teaspoon coffee of cinnamon
- Icing sugar (for dusting)
- Round mold - about 26-28 cm
- Mold in paper with the cross of Santiago

PREPARATION:

- Beat the eggs in a bowl. Go adding the sugar gradually while stirring . Add lemon and cinnamon.

- Toast the almonds in a pan without oil about 5-7 minutes stirring constantly. We will see that they take a little color. Turn off and let cool before adding to the mixture.

- Once all mixed add to the greased pan with a few drops of oil.

- Bake at 170 ° C for 30 minutes. Allow to cool .

- Place the cross of Santiago in the center of the cake and sift the icing sugar all over the cake. Carefully remove the mold of the cross and it's ready to serve.

martes, 24 de diciembre de 2013

Magaladenas de chocolate / Chocolate cupcakes

(For English version please read below)

Alguien me pidió una versión chocolatera de las magdalenas y aquí la tenemos. Solo hace falta agregar algún ingrediente más y voilà magdalenas de chocolate riquísimas con 0% gluten y 0% lactosa.


INGREDIENTES: (12-15 magdalenas)

- 4 huevos
- 220 gr harina (110 gr arroz, 55 gr maíz, 55 gr garbanzo)
- 90 gr azúcar moreno
- 150 ml aceite de oliva virgen extra
- El zumo de media  naranja
- 1 sobre de levadura 
- Un pellizco de sal
- Una pizca de goma xantana (opcional)
- Azúcar blanco para espolvorear
- Una tableta de chocolate negro 


PREPARACIÓN:

- Batir los huevos en un bol grande junto con el azúcar, el zumo de naranja y el aceite. 

- En un bol aparte mezclar bien las harinas con la levadura, la goma xantana y la sal. Cuando esté mezclado añadir al bol grande y volver a mezclar todo muy bien. Trocear la tableta de chocolate  en pequeños trozos y añadir a la masa.

- Meter la mezcla en una bolsa, cerrarla y dejar reposar la masa en la nevera unos 30 minutos.

- Preparar los moldes de magdalenas con las papelinas. Cortar la esquina de la bolsa de plástico y verter la masa hasta llenar los moldes hasta un poco más de la mitad - unas 3/4 partes-. 

- Meter en el horno precalentado a unos 170ºC y dejar por 12-15 minutos para las magdalenas pequeñas y por 20-25 minutos para las magdalenas grandes.

- Para conservarlas yo las guardo en un recipiente de cristal hermético pero si queréis que os duren más allá de unos días las podéis congelar sin problemas. Así siempre las tendréis a punto cuando os apetezcan.


--

Someone asked me a chocolate version of cupcakes and here it is. You just need to add one ingredient to the basic receipe and voilá a delicious chocolate cupcakes with 0% gluten and 0% lactose.


INGREDIENTS: (12-15 cupcakes )

- 4 eggs
- 220 gr flour ( 110 gr rice, corn 55 gr , 55 gr chickpeas )
- 90 gr brown sugar
- 150 ml extra virgin olive oil
- The juice of half an orange
- 1 packet of yeast
- A pinch of salt
- A pinch of xanthan gum (optional)
- White sugar for dusting
- Dark chocolate bar 


PREPARATION:

- Beat the eggs in a large bowl with the sugar, the orange juice and the oil.

- In a separate bowl mix well the flour with the baking powder, the xanthan gum and the salt. When its well mixed add to the other bowl and mix again all fine.  Chopped the chocolate bar into small pieces and add to the mixture.

- Put the mix in a platic bag, close it and let the dough rest in the fridge for 30 minutes.- Prepare cupcakes cups with paper sheets. Cut the corner of the lastic bag and fill the sheets with the mix -little more than half part, moreless 3/4 parts-.

- Place in a preheated oven at 170 ºC and leave for 12-15 minutes for small cupcakes and 20-25 minutes for large muffins.

- To preserve a few days I put the cupcakes in an airtight container, but I you need to preserve more time you can freeze them.

Bizcocho marmolado / Marble cake

(For English version please read below)

Para Sandra, uno de mis primeros intentos de repostería con chocolate. Si estáis leyendo esta receta es que ha pasado su cata con aprobado. Es una receta muy sencilla, rápida de preparar y muy resultona.


INGREDIENTES:

- 3 huevos
- 1 yogur
- 3 vasos de yogur de harina (2 de arroz y 1 de garbanzo)
- 1 y 1/2 vasos de yogur de azúcar moreno
- 1/2 sobre de levadura
- 1/2 vaso de aceite de oliva virgen
- 2 cucharadas sopearas de chocolate en polvo o 3/4 de una tableta de chocolate negro


PREPARACIÓN:

- Batir los huevos en un bol y agregar el yogur, el azúcar y el aceite.

- En otro bol mezclar las harinas con la levadura. Agregar poco a poco a la mezcla anterior si puede ser tamizando la harina y sin parar de remover.

- Una vez bien mezclado separar la mitad de la masa en un bol. Trocear la tableta de chocolate y calentar al en un cazo hasta que se derrita. No hay que dejar que hierva. Añadir el chocolate a una de las masas y remover bien.

- Rápidamente verter las dos mezclas a la vez en el recipiente de horno previamente engrasado con aceite.

- Meter al horno a unos 170 ºC durante 30 minutos. Dejar que se enfríe antes de hornear.


--
For Sandra, one of my first attempts at baking with chocolate. If you are reading this recipe is that it has been approved with by her. It is very simple and quick to prepare.


INGREDIENTS:

- 3 eggs
- 1 yogurt (without lactose)
- 3 cups of flour yogurt (2 rice and 1 cornstarch)
- 1 and 1/2 cups brown sugar yogurt
- 1/2 packet of yeast
- 1/2 cup olive oil
- Sopearas 2 tablespoons cocoa powder 3/4 of a tablet of black chocolate


PREPARATION:

- Beat the eggs in a bowl and add the yogurt, sugar and oil.

- In another bowl mix the flour with the yeast. Gradually add to the mixture stirring constantly.

- Once well blended separating half the dough in a bowl. Chop the chocolate and heat in double boiler until melted. Do not boil. Add the chocolate to one ofthe bowls and stir well.

- Quickly pour the two mixtures together in the mold previously oiled. 

- Insert in the oven at 170 º C for 30 minutes. Allow to cool before unmolding.

martes, 10 de diciembre de 2013

Magdalenas con copeta/ Cupcakes

(For English version please read below)

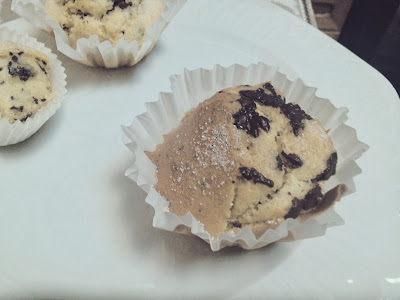
Me encontraba hace unos días con antojo de magdalenas. Decidí probar todas las variedades de magdalenas sin gluten que encontraba a la venta (Airos, La cocina de Siena,etc). Pero bien por el sabor demasiado industrial en unos casos, o bien por el precio desorbitado en otros, me he aventurado a probar algunas recetas que he encontrado por internet y adaptarlas a mi versión sin gluten y sin lactosa. 

El primer intento fue algo desastroso, quedaron bonitas pero no muy gustosas, pero en el segundo intento, con un poco de ayuda para remover la masa, han quedado unas magdalenas de anuncio! Solo falta perfeccionar algún detalle como la capa de azúcar que queda en algunas magdalenas en la copeta. Pero por el resto creo que me quedaré con esta receta que comparto con vosotr@s.


INGREDIENTES: (12-15 magdalenas)

- 4 huevos
- 220 gr harina (110 gr arroz, 55 gr maíz, 55 gr garbanzo)
- 90 gr azúcar moreno
- 150 ml aceite de oliva virgen extra
- El zumo de media  naranja
- 1 sobre de levadura 
- Un pellizco de sal
- Una pizca de goma xantana (opcional)
- Azúcar blanco para espolvorear


PREPARACIÓN:

- Batir los huevos en un bol grande junto con el azúcar, el zumo de naranja y el aceite. 

- En un bol aparte mezclar bien las harinas con la levadura, la goma xantana y la sal. Cuando esté mezclado añadir al bol grande y volver a mezclar todo muy bien. Meter la mezcla en una bolsa, cerrarla y dejar reposar la masa en la nevera unos 30 minutos.

- Preparar los moldes de magdalenas con las papelinas. Cortar la esquina de la bolsa de plástico y verter la masa hasta llenar los moldes hasta un poco más de la mitad - unas 3/4 partes-. 

- Meter en el horno precalentado a unos 170ºC y dejar por 12-15 minutos para las magdalenas pequeñas y por 20-25 minutos para las magdalenas grandes.

- Para conservarlas yo las guardo en un recipiente de cristal hermético pero si queréis que os duren más allá de unos días las podéis congelar sin problemas. Así siempre las tendréis a punto cuando os apetezcan.

*Yo uso varios tipos de moldes todos con buen resultado -en todos pongo papelinas-: 
1- Moldes grandes y metálicos  
2- Moldes pequeños de silicona 
3- Moldes de aluminio tipo flanera


--

For a few weeks I start enjoying triying all the different kinds of gluten-free cupcakes that I found on shops. Spanish brands like Airos, Schär,  La cocina de Siena, etc). But someone because of the industry flavour, other ones because of the high price, I decide toprepare my own recipe gluten and lactose free.

The first try was a little disastrous, they result nice but not so tasty, The second time, with a little help to remove the mixture, I can say I have found a perfect recipe for cupcakes! I just need to change some detail like the sugar coating over the cupcake. But for the rest I think I will repeat this recipe that I share with you.


INGREDIENTS: (12-15 cupcakes )

- 4 eggs
- 220 gr flour ( 110 gr rice, corn 55 gr , 55 gr chickpeas )
- 90 gr brown sugar
- 150 ml extra virgin olive oil
- The juice of half an orange
- 1 packet of yeast
- A pinch of salt
- A pinch of xanthan gum (optional)
- White sugar for dusting


PREPARATION:

- Beat the eggs in a large bowl with the sugar, the orange juice and the oil.

- In a separate bowl mix well the flour with the baking powder, the xanthan gum and the salt. When its well mixed add to the other bowl and mix again all fine. Put the mix in a platic bag, close it and let the dough rest in the fridge for 30 minutes.

- Prepare cupcakes cups with paper sheets. Cut the corner of the lastic bag and fill the sheets with the mix -little more than half part, moreless 3/4 parts-.

- Place in a preheated oven at 170 ºC and leave for 12-15 minutes for small cupcakes and 20-25 minutes for large muffins.

- To preserve a few days I put the cupcakes in an airtight container, but I you need to preserve more time you can freeze them.

* I use several types of molds with a good result -in all I use paper sheets-:
1 - Large metal molds
2 - Small molds
3 - Aluminum molds


domingo, 8 de diciembre de 2013

Mantequilla de cacahuete casera / Homemade peanut butter

(For English version please read below)

Hace unos meses que una amiga me trajo un tarro de mantequilla de cacahuete desde Estados Unidos. Para asegurarme que era apta para celíacos me puse en contacto con una Asociación de Celíacos de la zona y me confirmó que la marca no era segura porque podía contener trazas. Una lástima. Sobretodo porque me apetecía muchísimo probarla.

"A grandes males, grandes remedios". En casa se han aficionado a la mantequilla de cacahuete y yo seguía con muchas ganas de probarla. Así que hemos optado por la opción de prepararla en su versión casera para poder comerla tod@s. Una receta muy fácil, nutritiva y que nos asegura una mantequilla de cacahuetes 100% natural. ¿Os atrevéis?


INGREDIENTES:

- 150 gr de cacahuetes (ya pelados, sin tostar y sin sal)
- 1 y 1/2 cucharadas de postre de aceite de oliva virgen extra
- 1/2 cucharada de postre de azúcar (opcional)
- 1 pizca de sal (opcional)

PREPARACIÓN:

- Pelar los cacahuetes y tostarlos en una sartén (sin aceite) durante unos 10 minutos. Es importante ir removiendo cada poco tiempo para que se tuesten por todos los lados. Cuando empiecen a tener un tono tostado es el momento de apagar el fuego y dejar enfriar.

- Poner los cacahuetes en una picadora o procesadora de alimentos y triturarlos hasta una consistencia de pequeños trocitos. Añadir una o dos cucharadas de postre de aceite y si se desea de sal o azúcar. Dependiendo el uso que le queramos dar a la mantequilla de cacahuete. En mi caso la primera vez que la preparé eché tan solo un pellizco de sal, para probar su sabor el natural. Al acabar siempre siempre le podéis añadir algo más y remover bien. 

- Poner la mantequilla resultante en un tarro de cristal y guardar en la nevera. Se conserva bien durante un mes aproximadamente.

--


Few months ago a friend bring me a peanut butter jar from USA. Before eating I contact to a Celiac Association in the country and they told me the brand wasn't able to celiacs because of the cross contamination. Then the result was that my family start to try the butter peanut and I want to try it!

The solution was easy, I prepare my own peanut butter at home. Easy ingredients, easy preparation and 100% natural. ¿Dare you?


INGREDIENTS:

- 150 gr Peanuts (raw, peeled and not salty)
- 1 and 1/2 desertspoon of extra virgin Olive oil
- 1/2 desertspoon of sugar (optional)
- A pinch of salt (optional)

PREPARATION:


- Peel the peanuts and roast them in a pan (no oil) for about 10 minutes. It is important to stir every few minutes to crisp up on all sides. When the peanuts begin to tan tone is the time to turn off the heat and let cool.


- Put the peanuts in a blender or food processor and grind to a consistency of small pieces. Add one or two tsp oil and if you like a pinch of salt  or sugar. Depending on the use you want to give to the peanut butter. In my case the first time I prepared it I just threw a pinch of salt, to taste it natural. At the end you can always add more and stir well.

- Put the butter resulting in a glass jar and refrigerate. Keeps well for about a month.


miércoles, 6 de noviembre de 2013

Concurso de cocina AMANDIN / Cooking competition by AMANDIN

(For English version please read below)

La marca AMANDIN ha organizado un concurso de recetas sin gluten en el que he sido galardonada con el segundo premio. Desde mi modesto blog quiero felicitarles, en primer lugar por la iniciativa del concurso y en segundo lugar por poner en el mercado una variedad de productos de alta calidad, ecológicos y aptos para el colectivo celiaco y, además, sin lactosa.

Para los que no los conozcáis os recomiendo echar un vistazo a su web y el blog de recetas donde podréis encontrar las recetas participantes en el concurso. Aquí os dejo la foto de mi premio: un amplio lote de productos AMANDIN para poder probar todas las variedades. Lo he recibido hoy mismo y me estoy decidiendo por cual de los productos empezar primero!


--
AMANDIN brand has organized a gluten-free recipe contest in which I have been awarded with the second prize. From my blog I would like to congratulate them, first by the initiative of the contest and in second place because of the variety of high quality products, ecologic and suitable for celiacs and also lactose free.

For those who do not know about them I recommend to take a look at their website and the blog contest (only in Spanish) where you can find a list of  recipes. I let you a picture of one of their products that they send my as a prize: they send me a pack of AMANDIN's products so I have to decide witch one I will try first. All them seem delicious!

Hazelnut crem, they also have almond cream and nut cream


sábado, 2 de noviembre de 2013

Panellets / Traditional catalan Halloween sweets

(For English version please read below)


Cuando empieza noviembre es el tiempo de disfrutar en familia de ese dulce tradicional de Cataluña y muy nutritivo que se conoce como Panellets. Están disponible en todas las panaderías y pastelerías aunque los precios suelen ser un poco elevados dado que uno de los principales ingredientes son los frutos secos, almendras y piñones.


Si tenemos tiempo y ganas podemos pasar una tarde entretenida preparando los panellets en casa. Además con esta opción controlaremos que los ingredientes y su manipulación sean sin gluten. Es un dulce que se conserva bastante bien después de hecho por lo que se puede hacer una cantidad grande para tener varios días y disfrutar en desayunos, meriendas o postre.


INGREDIENTES:

Para la masa:
- 150 gr patata cocida
- 150 gr boniato cocido
- 500 gr almendra molida
- 400 gr azúcar de caña
- Ralladura de medio limón

Para decorar los panellets*:
- 300 gr piñones
- 300 gr almendra granulada
- 3 huevos
- Harina de arroz (para espolvorear la bandeja de horno)
- Aceite de oliva (para engrasar bandeja del horno)

*También pueden hacerse de coco, membrillo, chocolate, cerezas confitadas,..

PREPARACIÓN:

- Cocer la patata y el boniato con piel.  Una vez cocido pelar y dejar enfriar (24 horas). Chafar con un tenedor y mezclar bien con el azúcar, después agregar la almendra molida, la ralladura de limón y volver a mezclar. Dejar reposar la mezcla unas horas.

- Separa la yema de dos huevos de las claras, reserva éstas y vierte las yemas en la mezcla anterior removiendo para que se mezclen todos los ingredientes. Pon en cuencos separados los piñones y la almendra granulada.

- Ir haciendo bolitas (unos 20-25 gr cada una aproximadamente), pasarlas por las claras de huevo y después rebozar con piñones una parte de la masa y la con almendras granuladas el resto. Una vez elaborado cada panellet ponerlo en una bandeja de horno, previamente untada con aceite el fondo y espolvoreado harina para que no se peguen al cocerlos. Antes de meter en el horno hay que pintarlos con la yema de huevo, podemos ayudarnos de un pincel para ello.

- Meter en el horno con grill previamente calentado a 170ªC durante unos 10-12 minutos. Estarán listos cuando la superficie de los panellets esté dorada. A disfrutarlos!

--
When novemeber starts its time to prepare the traditional catalan sweets called Panellets. It's a delicious and also nutricious sweet that we use to celebrate the chestnut's day (from october 31 to november 1). They are avalible in all bakerys and you will see the prices are quite expensive because one of the principale ingredients are  pinions. If you have time ans enjoy cooking you can prepare your own version at home. Also in this way you will control the manufacturing of the ingredients to be sure there are not gluten in the panellets.
Remember to verificate that all the ingredients you use are certified gluten free.


INGREDIENTS:

For the mass:
- 150 gr baked potatoes
- 150 gr baked boniato (sweet potato)
- 500 gr almond flour
- 400 gr cane sugar
- Grated rind of half a lemon

For the decoration of the panellets:
- 300 gr pinions
- 300 gr granulates almond
- 3 Egg 
- Olive oil (to spread in the baked sheet)
- Rice flour (to sprinkle in the baked sheet)

*You can also decorate the panellets with chocolate, coconut, quince, candied cherries,...


PREPARATION:


- Cook the potato and sweet potato with the skin. Once cooked peel and let cool (24 hours) . Squash with a fork and mix thoroughly with sugar , then add the ground almonds, the lemon zest and mix again . Let the mixture stand a few hours.

- Separate two eggs yolks from the whites. Put the pinions and granulated almonds in separate bowls.

- Make small balls (about 20-25 g each), roll in the egg whites batter with pine nuts one part of the mixture. The other part make the same process but batter with the almonds. Once prepared each panellet put on a baking tray, previously greased with oil and sprinkled flour on the bottom to prevent sticking during the cooking. Before putting in the oven you have to paint with egg yolk, a brush can help to do it.

- Bake in a preheated oven grill to 170 º C for about 10-12 minutes. They will be ready when the surface is golden panellet. Enjoy them!

miércoles, 9 de octubre de 2013

Crema de calabaza / Pumpkin Cream

(For English version please read below)

Llega el otoño y empieza el tiempo de llenar la despensa de colores anaranjados con la calabaza y los boniatos. Ingredientes sencillos, económicos y sin gluten con los que se puede dar un toque original y creativo a los menú del día a día.

Hoy os dejo una receta para hacer una crema de calabaza rápida, y muy fácil de preparar. Por supuesto admite mil y una variantes según vuestros gustos. A mi me encanta el sabor de la calabaza así tal cual así que pero también queda bien con puerro, patata, o la verdura que más os guste.


INGREDIENTES:

- 1/2 calabaza mediana
- 1/2 cebolla tierna o puerro
- Un vaso de agua
- Sal, aceite y pimienta

PREPARACIÓN:

- Pelar la calabaza y sacar las semillas y cortar en trozos. Pelar y trocear la cebolla y poner los dos ingredientes en una olla junto con el agua. Cuanto más pequeños hagamos los trozos más rápido se cocinará.
-  Encender el fuego y dejar hervir unos 15-20 minutos. Cuando la calabaza esté tierna apagar el fuego.
- Machacar bien con el tenedor o si preferís una textura más fina pasar por el miniprimer y ya tenemos el puré listo para servir. Aliñar al gusto con sal, pimienta, aceite, semillas de sésamo, gomasio...

--
When the autumn arrives its time to fill the pantry with the orange colour of the pumpkin alsothe sweet potatoes. Simple ingredients, economics and gluten free naturally. With them yoy can give a creative and original twist to the everyday menu .

Today I leave the recipe for pumpkin cream quick and easy to prepare. Of course it admits a thousand varieties according to your tastes. I really love the taste of sweet pumpkins so I don't use too many ingredients but you can try it with potato or other vegetable that you like.


INGREDIENTS:

- 1/2 medium pumpkin
- 1/2 fresh onion or leek
- A big glass of water
- Salt , oil and pepper

PREPARATION:


- Peel pumkin and scoop the seeds, cut into pieces. Peel and cut the onion. Put both ingredients in a pot with water. The smaller you make the pieces faster we will cook them.
- Turn on the heat and boil for 15-20 minutes. When the pumpkin is tender put out the fire.

- Mash well with a fork or if you prefer use a masher machine to find a finer texture and you will have the puree ready to serve. Remember to add the salt, the pepper, the oil or the sesame seeds toasted, gomasio ...

miércoles, 18 de septiembre de 2013

Bizcocho de yogur / Yogurt cake

(For English version please read below)

Esta vez os traigo un básico de siempre: el bizcocho de yogur. Esta mañana me levante con antojo de volver a probar el bizcocho de yougur que preparaba de pequeña, pero esta vez en la versión sin gluten y sin lactosa... Me aventuré con la receta original haciendo los mínimos cambios. Y el resultado no está nada mal. Os animo a que probéis está sencillísima receta y la adaptéis si queréis a vuestro gusto (añadir frutos secos, chocolate, manzana,...)


Aquí os dejo los ingredientes y la preparación. Yo le añadí de la mermelada de mora casera que preparé en el post anterior. In-cre-í-ble combinación! 

Atención ingredientes receta: Referente a la harina, si no tenéis un preparado especial de repostería podéis utilizar la siguiente mezcla: 2 medidas de yogurt de harina de arroz y una medida de maizena (harina de maíz). Si el yogur ya es azucarado, como ha sido mi caso, podéis añadir 1 medida y media de azúcar para compensar.

INGREDIENTES:

-3 huevos
-1 yogur Kaiku sin lactosa
-2 medidas de yogur de azúcar integral
-3 medidas de yogur de harina Schar Mix Dolci
- 3/4 de sobre de levadura química (sin gluten)
- 1/3 de medida de yogur de aceite de oliva
- Unas gotas de anís


PREPARACIÓN:

- Batir en un bol los huevos y añadir el yogur y el azúcar. Volver a mezclar e ir añadiendo poco a poco la harina mezclada previamente con la levadura. Añadir por último el aceite y las gotas de anís y remover bien para no dejar grumos.

- Untar un molde con aceite y espolvorear un poquito de harina. Añadir la mezcla anterior e introducir en el horno pre-calentado a 180ºC en la altura media. Dejar unos 30-40 minutos. Para saber si está listo pinchar con un palillo en el centro y ver que sale seco. Si queréis darle un toque distinto a la presentación podéis espolvorear con azúcar glas por encima.

--
In this post I bring you a basic, the yogurt cake. This morning I woke up with a craving to re-test the yougur cake that I prepare when I was a child, but this time in the version without gluten and lactose ... I try with the original recipe making the minimal changes. And the result is really good. I encourage you to try it because it is very simple and you can fill with different ingredients (add nuts, chocolate, apple, ...)

Here you have the ingredients and preparation. I added the homemade blackberry jam prepared in the previous post. In-cre-di-ble combination!


Attention recipe ingredients: If you don't have special flour to pastry, you can use the following mixture: 2 parts rice flour yogurt and a measure of cornstarch (corn flour). If it's sweetened yogurt, as in my case, you can add 1 scoop and a half of sugar to compensate.

INGREDIENTS:

- 3 eggs
- 1 lactose free yogurt
- 2 measures of yogurt with brown sugar
- 3 measures of yogurt withSchar Mix flour Dolci
- 3/4 of about baking powder (gluten free)
- 1/3 of yogurt with olive oil
- A few drops of anise


PREPARATION:

- Mix the eggs in a bowl and add the yogurt and  the sugar. Mix again and go slowly adding premixed flour with yeast. Finally add the oil and the drops of anise and stir well.

- Grease a pan with oil and sprinkle a little flour. Add the above mix and introduced into the pre-heated oven at 180 ° C in average height. Allow about 30-40 minutes. To find out if it's ready put a toothpick in the center and see what comes out dry. If you want to give a twist to the presentation can sprinkle with powdered sugar on top.

martes, 27 de agosto de 2013

Mermelada de moras / Blackberry jam

(For English version please read below)


Cuando se va acercando el final de agosto es la época de recolecta de las moras. Hace un par de años que me he aficionado a organizar alguna escapada por varias zonas de Cataluña para recogerlas. Y este año aprovechando un viaje por el norte de España para localizar sitios donde las zarzamoras campan a sus anchas y me permiten recolectar moras suficientes para llenar varios tarros de mermelada. 


La primera vez no fui preparada y mi camiseta acabó sirviendo de bolsa para moras con el consecuente tinte de color morado que le quedó al chafarse todas las moras del fondo. Pero ahora ya voy preparada para la ocasión excepto por los pinchazos en los dedos. Pero no nos pondremos quejicas que ya dicen que para presumir hay que sufrir, pues para comer mermelada de moras casera hay que pincharse los dedos.

La mermelada quedó exquisita. Solo os digo que no duró demasiado. Estaba realmente riquísima!! Y lo mejor es que su preparación no es nada complicada y permite su conservación durante varios meses. 

Este año tengo en la nevera 3 kg de moras. Aquí os dejo la receta y os animo sin duda a probarla con moras o con la fruta de temporada que más os apetezca. Si queréis regalar un tarro siempre podéis decorarlo con un trozo de tela y colocar una etiqueta que diga el tipo de mermelada.


INGREDIENTES:

- 1 kilo de moras (mejor acabadas de recolectar)
- 400 gr de azúcar moreno de caña
- 1/4 de manzana 
- El zumo de 1/2 limón

PREPARACIÓN:

- Limpiar las moras de los tallos que puedan haber quedado y lavar con abundante agua. Poner a escurrir un poco. Pelar la manzana y cortar en trozos muy finos.
- Colocar las moras en una olla en la que vayan a poder removerse con comodidad. Agregar el azúcar, la manzana y el zumo de limón. Remover y dejar reposar la mezcla un mínimo de dos horas.
- Una vez transcurrido ese tiempo encender el fuego medio/alto y hervir durante unos 40 minutos aproximadamente removiendo de vez en cuando para que no se pegue.
- Cuando este lista introducir en los tarros de vidrio previamente esterilizados* tapar y dejar enfriar los botes boca abajo. Es importante no darles la vuelta hasta que estén completamente fríos.

* Como esterilizar los tarros de vidrio y tapas:
Se puede hacer de diversas formas yo os comento la que encuentro más práctica y segura. Las tapas limpias deben ponerse en una cazuela con agua durante 10 minutos. Y los tarros de vidrio limpios en el horno a altura media y con el horno frío y poner a calentar a unos 120ºC, dejar 15 minutos. Al sacar ponerlos boca arriba en un paño de cocina limpio sobre una mesa o encimera.
Cuidado al manipular después de esterilizar: No se deben tocar los tarros por dentro o las tapas por la superficie que estará en contacto con la mermelada.

--
At the end og August is time of blackberries. A couple of years ago I have organized a trip into several areas of Catalonia to collect them. And this year during a trip through northern Spain I have located sites where blackberries grows and allow me to collect enough berries to fill several jars of jam.


The only thing you will need to pick up blackberries is patience, a bag and no pain in yor hands (because of the thorns they have). I think I'm ready for it except for finger pricks. But if no pain no gain so, to eat homemade blackberry jam you have to pinch fingers.

Remember theat the jam is exquisite. I will only say that it didn't stay long time in the pantry. And the best part is that their preparation is not complicated and allows preservation for several months.

This year I have in the fridge 3 kg of blackberries. Here you have the recipe and definitely encourage you to try with berries or seasonal fruit you most want. If you want to give a jar you can decorate it with a piece of cloth on the top and place a label with the type of jam.

INGREDIENTS:

- 1 kg of blackberries (better collected, it could be also frozen)
- 400 gr of brown cane sugar
- 1/4 of apple
- The juice of 1/2 lemon

PREPARATION:

- Clean the berries from the stems that may remain and wash with water. Put drain a little. Peal the apple and cut into very small pieces.
- Place the berries in a pot in which they will be able to comfortably removed. Add sugar, the apple and lemon juice. Stir and let the mixture stand at least two hours.
- After that time turn on medium / high heat and boil for about 40 minutes, stirring occasionally to prevent sticking.
- When it is ready fill until the top the pre-sterilized glass jars * Cover and let cool upside down. It is important not to turn them until they are completely cold.

* How to sterilize glass jars and lids:
It can be done in different ways I tell the one that I find most practical and safe. Sterilize the lids by putting in a pot with boiling water for 10 minutes. And sterilize the glass jars in the oven at medium altitude, introduce on the cold oven and put to heat to about 120 ° C, allow 15 minutes. Ehen done face them up on a clean kitchen towel.
Care in handling after sterilization: Do not touch the inside jars or lids on the surface that will be in contact with the jam.


martes, 23 de julio de 2013

Mis pedidos sin gluten online

(For English version please read below)

"En la variedad está el gusto"

Este refrán queda entre comillas para los celiacos porque en algunos productos no queda más remedio que comprar lo que hay sin poder elegir entre varias opciones. Es cierto que cada día se encuentran más marcas que se van introduciendo al mercado, cosa que es muy de agradecer en mi opinión, por todo el colectivo.

Pero aún así sigo pensando que me gustaría disfrutar de más variedad. Y viendo que en otros países tienen muchos productos sin gluten que aquí no llegan empecé a buscar por internet opciones para poder variar un poco y probar nuevos sabores sin gluten.


Mi primera elección, hace unos meses fue: GLUTENFREESHOP.ES Además de productos sin gluten en su página web encontrareis un blog con recetas y algunos artículos con las últimas novedades sobre la celiaquia y el gluten. Interesante echarles un ojo para apreciar como la creatividad no tiene límites. Todos los productos están cuidadosamente seleccionados y son ecológicos. Una delicia para los amantes de lo bio. Tienen además un apartado de cosmética y suplementos nutricionales. Su responsable, Maria, es muy atenta y conoce a la perfección los productos que vende por lo que te puede ayudar a resolver cualquier duda.
Goma xantana, adquirida en GLUTENFREESHOP


En segundo lugar he encontrado también una empresa española: SINGLUTEN.COM que hace envíos gratuitos a domicilio para pedidos superiores a 50 euros. Un importe que rápidamente se alcanza cuando llenas tu cesta de la compra con productos sin gluten. Hoy me llegó el pedido a casa y la verdad es que estoy encantada. Se ha tramitado muy rápido y los responsables también han tenido mucha atención en asegurarse que todo llegase correctamente. Aquí encontrareis tanto productos de marcas ecológicos como de otras marcas conocidas (Schär,etc).


Sopa de miso, adquirida en SINGLUTEN


Y ahora el reto es encontrar una web extranjera que distribuya en España y con la que consiga encontrar productos que se quedan fuera del mercado español por el momento. Países como Reino Unido, Alemania, Canadá. Estados Unidos e incluso Australia sorprenden por la gran diversidad de artículos sin gluten. Tengo varias webs localizadas pero prefiero explicaros la experiencia una vez haya hecho y recibido el pedido. Si conocéis alguna web interesante estaré encantada de incluirla en mi selección.

--
"Variety is the spice of life"

And for celiacs this varity is reduced because in some products there is no a choice. It is true that every day there are more brands that are introducing new products into the market, which is very welcome in my opinion, for the entire collective.

Anyway I still think that I would enjoy more variety. In other countries I have seen that there are many gluten-free products that we cannot find here in Spain. Then I decide to try few online gluten free shops. 


My first choice was few months ago: http://www.glutenfreeshop.es/ They sold gluten-free products and you will find also a blog with recipes and some articles with the latest news about celiac disease and gluten. All products are carefully selected and are ecological. A delight for lovers of the bio. They also have a section for cosmetics and nutritional supplements. Besides its responsible, Maria, is very attentive and knows perfectly all the products so she can help you answering any questions.

Secondly I also found a Spanish company: http://singluten.com/ The make free home shipments for orders over 50 euros (into Spain). An amount that quickly reached when you fill your shopping bag with gluten free produts. Today I recived the order at home and the truth is I'm delighted. It has been processed very quickly and the respponsible have also had a lot of attention to ensure that everything arrived correctly. Here you will find organic brand products and other brands no organic (Schär, etc).

And now the challenge is to find a international web that sends the product to Spain and to find products that are not avalible in Spanish market at the moment. Countries like UK, Germany, Canada. United States and even Australia surprised me by the wide variety of gluten-free items. I have several sites located but I prefer to explain the experience once I have made received the order. If you know a interesting website I web'll be happy to include it in my selection.

martes, 18 de junio de 2013

Levadura de cerveza // Brewer's yeast

(For English version please read below)

Hoy me apetece compartir con vosotros un complemento alimenticio que forma parte de mi día a día:


LA LEVADURA DE CERVEZA

Aunque por su nombre parezca que deba llevar gluten (como pasa con la cerveza elaborada con cebada), la levadura de cerveza pierde su componente de gluten durante la fermentación o el procedimiento de secado y por lo tanto se vuelve apto para celíacos. Aún así debemos asegurarnos que el fabricante nos indique en la etiqueta que es "sin gluten" porque puede haber contaminación durante el envasado, etc. Por ahora solamente he encontrado una marca apta: Deliplus en Hacendado.

Es ideal para reforzar el pelo, las uñas y mejora la piel, y además está cargada de vitaminas del grupo B y aporta una dosis extra de proteínas en la dieta. Se pueden tomar hasta dos cucharadas soperas al día. A mi me gusta ponerla en las ensaladas, pasta, etc, como si fuese un condimento más. 

El sabor de la levadura de cerveza en copos es algo amargo. Con esto quiero decir que el primer día que la probé no me gustó demasiado. Aconsejo ir introduciéndola poco a poco hasta acostumbrarse al sabor que tiene. Y para aquellos o aquellas no soportéis el sabor podéis beneficiaros de las propiedades que tiene tomándola en cápsulas. Acordaros de revisar el envase para aseguraros que está certificado sin gluten.


Os dejo con un tentempié muy fácil de preparar para que lo disfrutéis a cualquier hora que apetezca:
Tortitas de aguacate con levadura de cerveza y frutos secos! 

INGREDIENTES:

- 1/2 aguacate maduro (que se chafe fácil con el tenedor)
- Tortitas de arroz o de maíz sin gluten
- 1 cucharada sopera de levadura de cerveza
- un puñado de frutos secos (piñones, anacardos, nueces,..)

PREPARACIÓN:

- Pelar el aguacate y cortar en láminas. Extender sobre las tortitas hasta cubrir toda la superficie.
- Espolvorear la levadura de cerveza y añadir los frutos secos por encima. ¡Que aproveche!


--
Today I want to share with you a food supplement that is part of my daily life:

BREWER'S YEAST

Because of the name it seems that it will contain gluten (like happens with the beer), but the brewer's yeast beer loses its gluten component during the process of washing and drying and is therefore suitable for coeliacs. However we must ensure that the manufacturer indicate on the label that it is "gluten free" because could exist a contamination during packaging. In Spain I have found a suidable brand: Deliplus de Hacendado.

This supplement is ideal for strengthen the hair, the nails and also the skin improvement, and it is also contains  vitamins (B1,B2, B3, B5, B9, Biotine) and provides an extra dose of protein in the diet. You can take two tablespoons a day. I like to add on the salads or pasta dishes like a condiment, but some people prefer to add it in yougurt or juices. 

The taste of the beer yeast is a bit special. I mean that the first day I tried it I don't like it too much. You can try to add it slowly until you get used to the taste. And for those or those you that can not bear with the taste, you can use the opcions of capsules. For this option also remember to check the packaging to assure that is certified gluten free.


Finally I give you a very easy way to prepare a healty and delicious snack to enjoy anytime you want;
Rice cakes with brewer's yeast avocado and nuts!

INGREDIENTS:

- 1/2 ripe avocado 
- Rice cakes (or corn cakes) gluten free
- 1 tablespoon of brewer's yeast
- A handful of nuts 

PREPARATION:

- Peel the avocado and cut into slices. Spread over the pancakes until cover the entire surface.
- Sprinkle the brewer's yeast and add the nuts on top. Enjoy the meal!

miércoles, 8 de mayo de 2013

Bizcocho de manzana / Apple cake

(For English version please read below)


Esta vez me he atrevido con el clásico bizcocho de manzana que ha salido bien al segundo intento. Los ingredientes son muy similares a los bizcochos anteriores. Simplememente hay que añadir la manzana que le da un toque dulce y aromático al bizcocho. Como la última vez hice dos bizcochos a la vez, probé a cortar uno de ellos en varios trozos y congelar. El resultado una vez descongelado, riquísimo! Y lo tengo a mano para cuando haga falta en un desayuno o merienda. Basta con sacarlo unas horas antes o meterlo en el microondas. Dicho esto os dejo la receta de la tarta de manzana a ver que os parece.


INGREDIENTES:

- 2 huevos
- 1 taza de harina de arroz
- 1/2 taza de maizena
- 1 cucharadita de café de bicarbonato

- 1 manzana golden
- 1/2 taza de azúcar moreno
- 1/3 taza de aceite de oliva
- 1/2 taza de leche de arroz o almendras

- 2 cucharadas de zumo de limón
- Un puñado de nueces troceadas

PREPARACIÓN:

- Batir los huevos en un bol, añadir el azúcar, el aceite, la leche de arroz, y el zumo de limón. Mezclar bien. Pelar y rallar la manzana y añadir a la mezcla anterior. Volver a mezclar. 


- En otro bol mezclar la harina con el bicarbonato y las nueces troceadas. Añadir a la mezcla anterior y remover hasta que quede una masa homogénea.


- Untar con aceite un recipiente, verter la mezcla anterior y meter al horno calentado previamente a 170ºc durante 45 minutos a altura media. Pinchar con un palillo la masa y si sale seco es que ya está en su punto. Dejar enfriar.


--
This time I want to present you my first apple cake. Of course it is gluten and lactose free, and delicious.
I have to admit that I need two tries to obtain a presentable one. The ingredients are very similar to the 
other cake's I present before. Just add the apple to give a sweet and aromatic flavor. The last time I make two cake at a time, then one of them I cut in to pieces and froze. The result was delicious! And I have always prepared for breakfast or snak. Just need to remove from freezer few hours before or use the microwave. After that I leave you the receipe of the apple cake. 


INGREDIENTS

- 2 eggs
- 1 cup rice flour
- 1/2 cup cornstarch
- 1 teaspoon of baking soda

- 1 golden apple 
- 1/2 cup brown sugar
- 1/3 cup olive oil
- 1/2 cup rice or almond milk
- 2 tablespoons lemon juice


PREPARATION


- Beat the eggs in a bowl, add the sugar, oil, rice milk and lemon juice. Mix well. Peel and grate the apple and add to the mix.


- In another bowl mix the flour with the baking soda and the chopped nuts. Add to the above mixture and mix well.


- Spreads with oil a baking dish, pour the mixture and put in a preheated oven at 170 ° C for 45 minutes at medium altitude. Let it cool and enjoy it!

sábado, 6 de abril de 2013

Bizcocho de zanahoria y nueces / Carrot cake with nuts

(For English version please read below)

Para variar del exquisito Bizcocho de plátano me adentré en los foros para descubrir una receta que merecía la pena probar por todas las opiniones favorables que tenía: el bizcocho de zanahoria.  Para los que ya seáis usuales solo deciros que ojalá lo hubiese descubierto antes!! Y para los que no os atrevíais a probarlo os animo porque de verdad, merece la pena. Y como siempre con ingredientes adaptados a dietas SIN GLUTEN y SIN LACTOSA. Una delicia.


INGREDIENTES

- 3 huevos
- 100 gr de zanahoria rallada fina
- 150 gr de harina de arroz
-  50 gr de maizena
- 1 cucharadita de café de bicarbonato
- 80 gr de azúcar moreno
- 1/2 taza de aceite de oliva
- 100 ml de leche de arroz o almendras
- 1/2 cucharadita de canela (opcional)
- 2 cucharadas de zumo de limón
- 4-5 nueces troceadas

PREPARACIÓN

- Batir los huevos en un bol, añadir el azúcar, el aceite, la leche de arroz, la zanahoria, la canela y el zumo de limón. Mezclar bien.

- En otro bol mezclar la harina con el bicarbonato y las nueces troceadas. Añadir a la mezcla anterior y mezclar bien.

- Untar con aceite un recipiente, verter la mezcla anterior y meter al horno precalentado a 170ºc durante 35 minutos a altura media. Dejar enfriar.

--
I want to show you another way to enjoy a saturday morning with a delicious breakfast's cake. After the amazing Banana cake I have discovered I want to try new versions, and the carrot cake has a lot of favorable comments. Then I decided to try it... and it was a wonderful choise! Also I adapted to the GLUTEN and LACTOSE free version.

INGREDIENTS

- 3 eggs

- 100 gr of carrot (grated fine)

- 150 gr rice flour

- 50 gr cornstarch

- 1 teaspoon of baking

- 80 gr brown sugar

- 1/2 cup olive oil

- 100 ml rice or almond milk

- 1/2 teaspoon cinnamon (optional)

- 2 tablespoons lemon juice

- 4- 5 chopped nuts 


PREPARATION


- Beat the eggs in a bowl, add the sugar, oil, rice milk, the carrot, the cinnamon and the lemon juice. Mix well.

- In another bowl mix the flour with the baking soda and chopped nuts. Add to the above mixture and mix well.

- Spreads with oil a baking dish, pour the mixture and put in a preheated oven at 170 ° C for 35 minutes at medium altitude. Let it cool and enjoy it!